This orphan showed up in a basket at my doorstep in March. It began its life as a digital file which was commissioned by Eric from Impact Props. I'm not sure who the digital modeler was. From there it was born on Eric's personal printer, and the journey began.

It was sanded, primed, and coasted with XTC-3D until something reasonable was obtained. I commend Eric for doing all of this work, as I certainly don't have the patience to.

From there, all of the bits with the exception of the grip section were block molded. This is the fastest and most expensive way to make a mold. They are easy to work with, don't tear as fast, absorb heat better, and do not deform unlike other types of molds.

Eric is a big fan of coating the mold in aluminum powder, which gives it a thin metallic coating that you can use to enhance the paint job on your prop. The cast part looks like this, and if you don't do much sanding or care about the seam lines that much, you can pretty much leave it as is and paint around it.

This is a matrix mold that Eric made for the grip. I'm not sure why he opted for a matrix mold for this piece. I'm guessing he was running low on silicone and didn't have enough for a box mold. The jacket is made from a product called free form air.
Unfortunately, the mold leaks. I cant say why, as I wasn't there when the first cast was attempted. I cleaned off all the resin that was stuck to the jacket material and relocated the pour spot to the bottom of the claw. I blocked off (mostly...) the original pour spout that was more towards the sights. This made the delicate sight detail reside at the bottom of the mold and ensured they were filled first and properly. This is the first pull I got. It looks like the mold could be used again, but it had served its purpose at this point, never to be used again.
Unfortunately, the mold leaks. I cant say why, as I wasn't there when the first cast was attempted. I cleaned off all the resin that was stuck to the jacket material and relocated the pour spot to the bottom of the claw. I blocked off (mostly...) the original pour spout that was more towards the sights. This made the delicate sight detail reside at the bottom of the mold and ensured they were filled first and properly. This is the first pull I got. It looks like the mold could be used again, but it had served its purpose at this point, never to be used again.

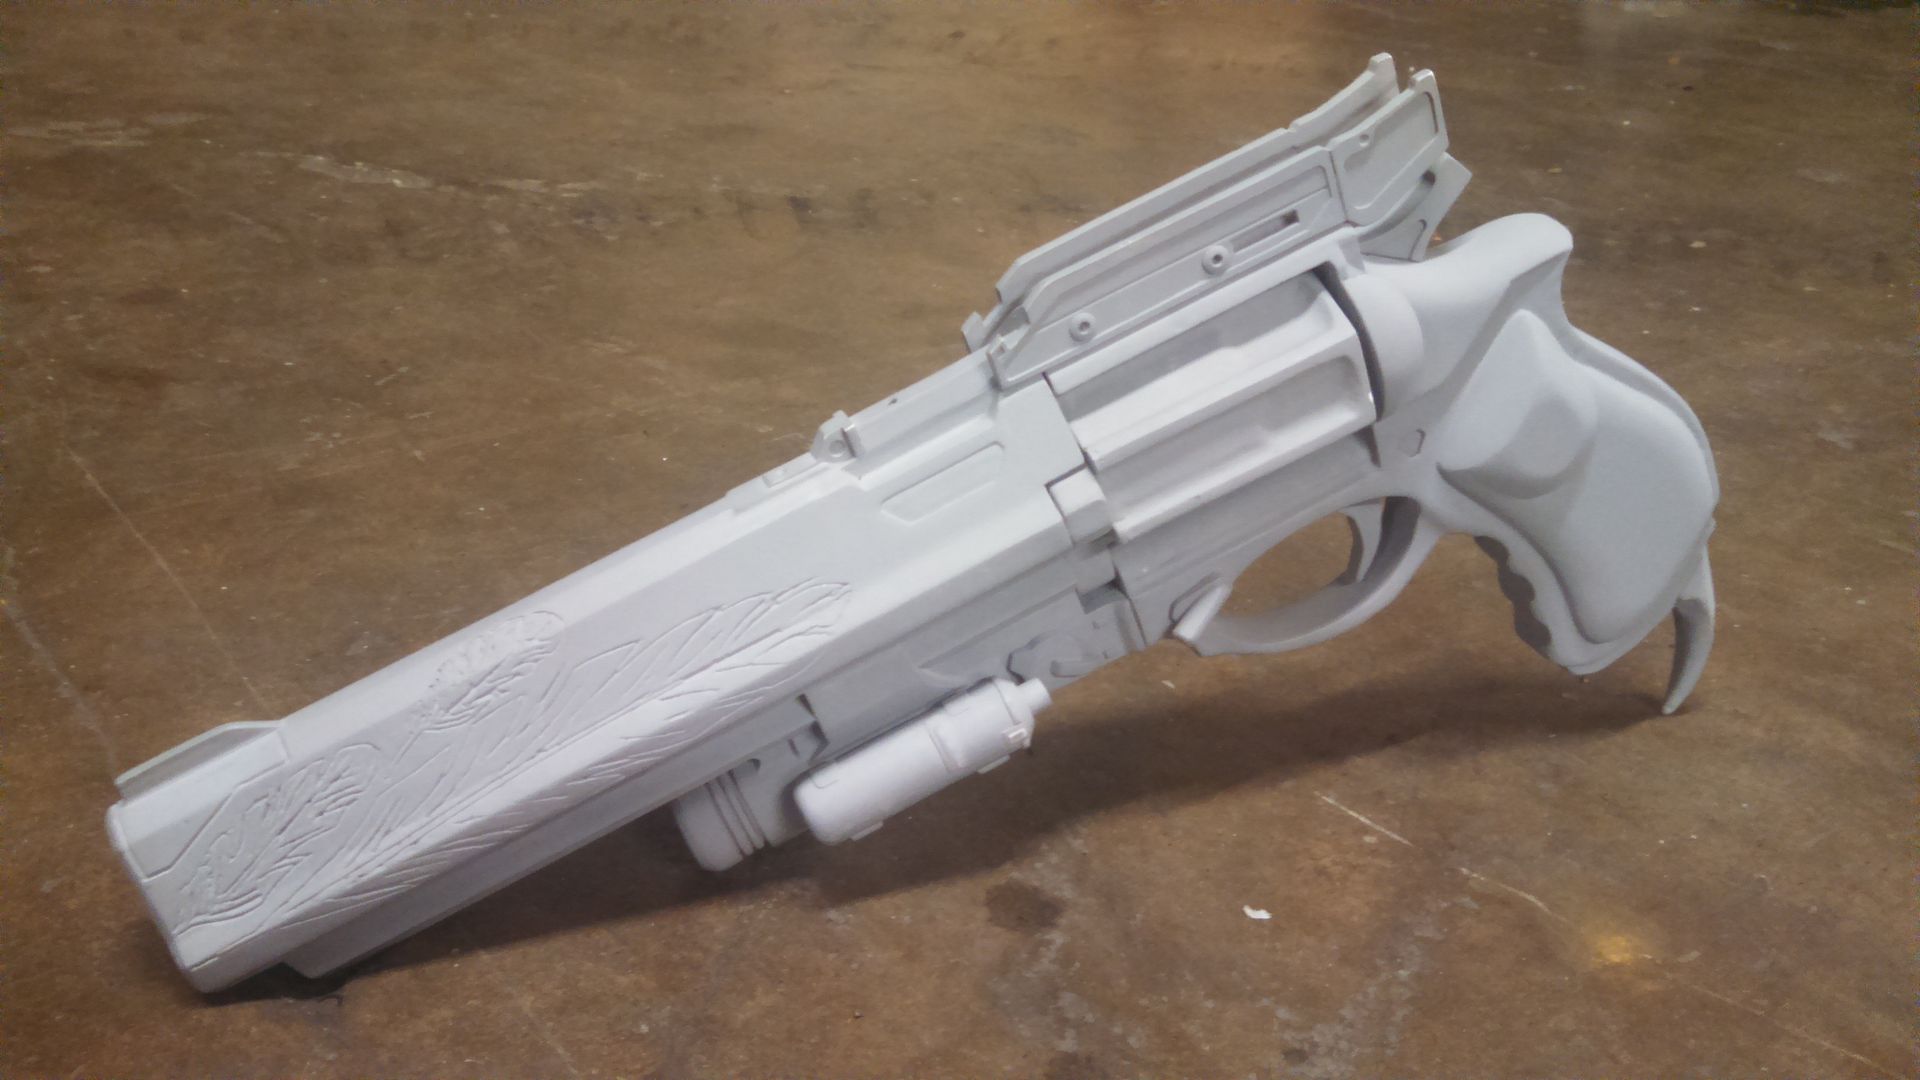
Here are all of the parts in a test fit. All I've really done here is clean the seam lines.

I had to decide at this point what path I wanted to take. I could either do some light clean up and then re-mold the grip area as a block mold for production casting...or I could clean up and re-work half of the gun like the deranged lunatic I am.
I chose the latter. I first re-made the circular ribbed front of the flashlight which you can actually see in the picture at this point if you look carefully. Then I cut off everything that was going to be re-made by hand, and fused the lower "flashlight" piece to the barrel section.
I chose the latter. I first re-made the circular ribbed front of the flashlight which you can actually see in the picture at this point if you look carefully. Then I cut off everything that was going to be re-made by hand, and fused the lower "flashlight" piece to the barrel section.

This certainly isn't meant to be an insult to anyone's work. No matter how good the file was, or how good the clean up was, the reality is detail is going to be lost, sanded flat, or heavily softened unless days are spent rebuilding the problem areas in bondo or some material that makes the whole project not worth printing in the first place. Luckily, instead of sanding PLA (Which I hate, passionately) I get to sand resin, which takes sanding, glue, and paint much better than PLA and cuts the prep time into a fraction. Although, this project still took a solid week to do.

I started with the top rail. It needed some crisp detail back, some detail holes, and some important ribs that space the rear sights. The modeler made the original sights too narrow and a hair undersized. I kept the assembly tab portion intact, which is why there is a seemingly random resin section in the middle of the styrene rail.

The sights were made by carefully cutting out layers of styrene with an exacto and laminating them together. It was tedious, but well worth the effort. I threw in a couple of rivets for detail.

I cleaned up some of the inset detail as well, like this upside down trapezoid right under the rail. I used an exacto, steady hand, and patience.

Theres a lot going on in this picture. First, I separated the swingarm and the cylinder into two separate parts. The modeler made them as one assembly for some reason, but who doesn't want a spinning cylinder??
Then, I finished blending those pesky flashlight sections together and added small details out of styrene and 1/8th inch MDF. I also re-made the wiring mount by the trigger area from scratch using MDF and a 1/4" dowel. Lastly, with the trigger removed I could clean up the trigger area and the trigger itself without too much hassle.
Then, I finished blending those pesky flashlight sections together and added small details out of styrene and 1/8th inch MDF. I also re-made the wiring mount by the trigger area from scratch using MDF and a 1/4" dowel. Lastly, with the trigger removed I could clean up the trigger area and the trigger itself without too much hassle.

The half domes behind the cylinder were re-made in MDF and enlarged. The hammer was re-made in MDF/styrene and made wider. I glued the hammer back in at this point after clean up. There's a little triangle bit you can see to the right of the trigger. I dremeled out the old one, re-made it in styrene, and carefully inset it into the grip and sanded it flush.

I used a graphite rubbing on paper to get the shape of the grip. Then I cut the grip out of 1/8th inch MDF. The bulge on the grip was simply another layer of MDF shaped before being glued on. I cleaned out all of the "stepping" texture around the grip. (I had already cleaned off 95% of it off the rest of the gun, which took a decent amount of time)
You can kind of see some grooves in the handle where my fingers are. These are represented as a texture in the game model, but I decided to make them a 3D feature and I think they look great.

A test fit. I cleaned off some more texture, and re-scribed the panel lines near the front sight.
I went back and did more shaping on the grip. I drilled holes for some nice big hex screws, and drafted out a grid for the grip bump/pimples/herpes. The round things are the smallest "pearl" details for scrapbooking I could find at Michael's. This is an old trick for fake rivets and the like that lots of prop maker use.

The results are well worth it!

For those curious, here's a parts breakdown of the prop. The cylinder pin is simply borrowed from my other hand cannon builds. The power cell is as well, bit doesn't fit in the cylinder and is simply a place holder since Eric never gave me the mold for his power cell. Check Impact props in the near future for a resin kit of this piece.

Oh, I also made this doohickey at the end for the cables.

On to the next!


Thanks for reading!
