It must take a deranged person to sit down one day to drop what they're doing and decide "Hey, I'm going to be an artist in this sloppy-seconds of an economy." Well, we're crazy, but we're still people too. Here's a few things you can do to make your encounter smoother, and in some cases, can make or break the possibility of a conversation get started at all.
All of the quotations henceforth are actual ones I have received, good or bad. If I lumped all the quotes I've heard other makers say they've gotten, this posting would be too.....colorful...
Numbr 1: put some efort into ur request
If you start your message with something like: " can u make me dis.....",
then your chances of hearing back from an artist (Or any professional,
really) diminish a bit. The biggest reason is attitude. If a sender
isn't willing to put in some effort to make their message sound
professional, it probably means they aren't going to pay for (Or
appreciate the details that go into) professional work. Chances are, these messages aren't being sent out in a hurry on the way to work, so try and put in that little extra effort to come across in a better light.
2: Provide details and expectations up front
"I have a project I'd like you to do. Please email me at .....@yahoo.com"
Unless you're Bioware or a big/awesome company that requires an NDA to be signed before any details are disclosed, chances are that any busy artist isn't going to chase you down for a project they know nothing about. Alternatively, not everyone prefers Facebook as their primary communicator, so if someone simply asks for an email address I oblige and continue the conversation there, where they usually provide details up front.
Take your car for example. If there's something wrong with your car, its your job to get it to the mechanic and give some information so they can diagnose it and give you a quote. If you can muster the strength to ask a mechanic to come to your house and peruse you for a quote, you're probably in for some pretty blank stares.
The kind of things you'll want to provide are....well, as much as you can. Commission work isn't typically an overly formal process. However, most people can agree that the information you provide before the work is started
is the standard that expectations will be measured against when the project is completed. The main two things are scale factor and reference material. A scale factor can simply be a length of the object in question, or the height of the client as a basis to compare and scale specific references to. By not specifying these things, you are trusting the artist's judgement and won't have much room to complain if the final product isn't sized to your liking.
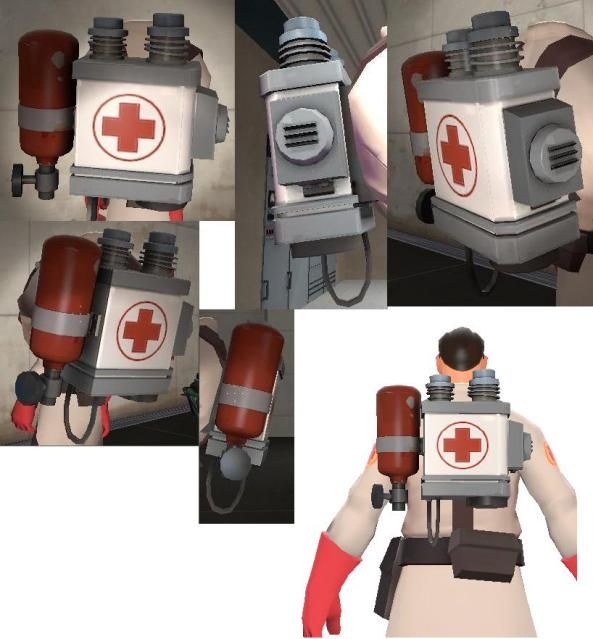 |
| Good reference. |
The images you provide should be high resolution and provide as many
angles as possible. This leaves less open to interpretation and saves a
TON of time. The images should also be consistent. If you're requesting
an anime object, the piece in question will vary scene to scene greatly.
Unless a blueprint is provided, it will be up to the artist to
interpret those frames into an object. Some sellers make blueprints and
factor them into their commission cost before starting. Some like myself
use full sized screenshots. If you're unsure about this aspect, simply ask before things get started.
3: Don't de-value the artist's work.
"I myself have two other resin kits and those did not cost nearly as much."
"Yikes. Is that your usual pricing?"
"My friend made this out of 6 PVC pipes and some cardboard. Why is yours so expensive?"
I'm not trying to sound like an elitist, but not all work is equal. If
you message a certain artist to inquire about their work, chances are
you hold that art to a higher standard than the products/artists you
currently have available or you would not have messaged them in the
first place. If you're just getting a feel for prices from multiple
artists, or you're simply messaging one for the first time try and be
respectful about it. I won't get off topic here, but if an artist puts
200 hours sculpting something and a few hundred in materials to
make/mold it, and they end up charging you a few hundred for a cast copy
of their work, its a steal. (unless you value your time at about
$1-2/hour trying to attempt it yourself if you can build it to a
similar standard)
Unfortunately we can't explain everything to everyone in regards to how
prices are what they are, but rest assured no one is making pile of
money here. Until you're tried it yourself, avoid sensitive remarks in
regards to an artist's pricing. A simple "Thanks for the quote" or "I'll
consider your offer while I get my finances in order" is a great
alternative, which brings me to my next point.
4: Thank the artist/close the conversation

Sometimes
an artist will go well out of their way to help someone with an
inquiry. Answering questions about paint/materials, general prop making,
or where to get a certain thing. I could have made a few novels if I
clumped together all of the responses I've given over the years. Even if
I don't expect a sale or I'm referring someone to another artist who
has a mold of something (and can therefore do it cheaper), I treat the
person the same. I think this goes for most artists who are trying to
help others and just generally be a decent human being. More times than
not though, I'll answer several emails helping someone out and they
take the suggestion and drop you like a rock. No acknowledging your
advice, no "thank you" of any sort. Its probably a result of bad
parenting, but in any case don't be that guy. We understand that things
come up and sometimes messages are delayed or missed entirely, (It
happens on both ends) but it still happens way more than it should.
Hopefully I can help turn the population into clear communicators, one late-night blog post at a time!
In the meanwhile, you can harass me on
Facebook, or at the
site.